If you want to change the default diamond-shaped milestones in SummaryPro to something else, like a star, follow these steps using standard Visio functionality.

Step 1: Import Your Chosen Image
Step 2: Access ShapeSheet - Alternatively see the update at the end to see how to add your connection point "freehand"

-
If the ShapeSheet option isn't available, you'll need to enable the Developer menu on the ribbon. Right-click on a blank area of the menu ribbon, select "Customize Ribbon," and check the "Developer" option on the right.
Step 3: Configure a Connection Points
-
In the ShapeSheet, you can adjust various aspects of the selected item. For this customization, focus on the "Connection Points" table.
-
If the "Connection Points" table isn't visible, follow these steps:
- Right-click on a blank area.
- Choose "Insert Section."
- Select "Connection Points" and click OK.

-
Locate the "Connection Points" table and edit the settings as follows:
- X: width*0.5
- Y: Height*0.5
- Type / C: 2
-
To make these changes, select the cell in the table and either double-click it or press F2. Make the adjustment, and then press Enter to save the change. Be careful not to add changes to the previous cell by not pressing Enter before moving to the next one.
Step 4: Attach the Image to the Milestone
- Your image now has a connection point in the centre. Simply drag it over the milestone, and it will snap to the centre of the milestone shape. It will also move along with the milestone if you change the date.
Step 5: Hide the Milestone
-
To hide the milestone, create a new style in the SummaryPro Styles sheet called "hidden." Configure it with Foreground Pattern = 0 and Line Type = 0, and apply this style to your milestone.
-
Ensure that the milestone's display settings are set to "Style" for both fill and line and choose "do not change" when the milestone is complete.

Now, your hidden milestone will carry the attached image while remaining invisible in your project timeline.

Update: It is possible to add the connection point to your image without using the shape sheet.
To do this use the connection point tool from the Home / Tools menu.

Select the tool and then hold down the CTRL key on your keyboard. This will allow you to click anywhere in the image you have inserted to add an attachment point. This will show up as a red or black dot.

Click on the black dot again to turn it red - this shows that it is selected. Now right mouse on it to display the connection type menu. This may need a little perseverance as the cursor's position when you click the right mouse button is sensitive.
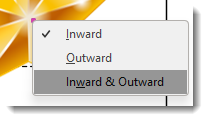
Select "Inward and Outward". Now you have a connection point that you can adjust to the desired location which will stick the image to your hidden milestone.